 I haven't posted in a long while. This posting is some of the why.
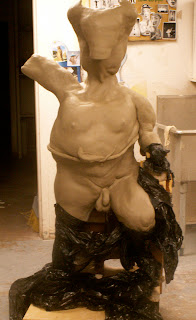
This is a project I developed as part of a class I was taking at Highlands University. I wanted to learn the skills necessary to plan and execute 3/4 life sized ceramic sculptural figures.
Ganesha was chosen because of his virtue in getting through tough thresholds.
The first step was to create a maquette. So, here he is at nine inches tall. I took him all the way through the glaze firing process to try out some glazing ideas as well.


The finished piece will be around 48 inches tall and so some adjustments to the form and composition were possible and necessary.
The cobra belt is designed to cover the seam where he is split in half in order to fit in our kiln.
While the maquette stood on his own, the full size version will likely require support in the back. His left foot will be resting on a human skull.

I loved the process of dancing with the clay in this construction. I allowed the clay to teach me where it wanted/could go while attempting to retain enough human proportion and anatomical detail to delight and not discomfort my eye.
This resulted in some surprising gestural passages that presented challenges in reconciling the figure as a whole.
However, every time I got "fussy" and tried to beat the form back into a more "classically" acceptable shape, I was defeated. So, ultimately I bowed to my teachers: gravity and clay and moisture and went with the energy, trusting it would all work out in the end.

Based on the maquette, his head would be about the same mass as his torso. I created a significant internal structure to support the weight on his chest and spine.

His neck proportions had to be massive for the head. Meanwhile everything was drying very quickly. Challenging to build the mass and at the same time get the shape for a workable form.


I was delighted to discover how an elephant head recapitulates the form of an elephant as a whole. Also many other animal forms surged into the process at the same time. what wonderful teaching/learning.


His tusks are made from porcelain and will be added later. I might cast them into bronze as well, not sure yet.

The pose of the arms and trunk are traditional. His right hand is grasping the broken end of his left tusk. His trunk is reaching for the bowl in his left hand.
I am very grateful for the support and feedback of many people (especially Al and Vic) throughout this process. I love how this project became truly a group effort.
Next steps are: drying, bisquette firing, glaze firing, stand construction and assembly, and finally installation. I pray we all survive each step of the process.


